Information in this article may not be canonical to the storyline of the games or any other Sonic continuity. |
The Challenge Rooms[1] are levels that appear in Sonic Boom: Fire & Ice. They are a series of bonus levels that can be entered through portals in the adventure levels. Here, the player must navigate an obstacle course to obtain a Trading Card. Each adventure level in the game has its own Challenge Room.
Overview


The Challenge Rooms and their entrance gates come in five unique designs derived from the adventure levels they appear in:
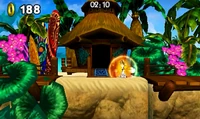
- Kodiak Frontier: Challenge Room entrances in Kodiak Frontier resemble ice totem segments with a walrus face carved on them. These rooms are set inside an ice cave. The roof is held up by pillars and the roads are made of snow-covered ice. Along the paths are curved ice spikes, mushrooms, and purple thorns. In the background is also a wide rift which shows a winter landscape of evergreen trees, mountains and cliffs outside.
- Seaside Island: Challenge Room entrances on Seaside Island are rustic wooden sea huts with straw roofs. These rooms are set in the deepest parts of the jungle. The background is obscured by giant trees with epiphytes and twisting branches, bamboos and tropical bushes, while the paths consist of plant-covered rock floors. Along these paths are more bushes, wooden roads, pots, tikis, and deadly red plants.
- Paleo Tarpits: Challenge Room entrances in Paleo Tarpits are forgotten stone huts with a giant sabretooth skull on them. These rooms are set a foggy wetland. Here, grass-covered stones outline the paths, which have giant insects, spearheads, bones, spiky bushes and multicolored plants along them. In the background is also a bog with ponds, tall spruces and other tropical bog trees, giant skeletons, and straw-like weed.
- Cutthroat Cove: Challenge Room entrances in Cutthroat Cove are giant drums decorated in Eggman's likeness. These rooms are set inside a sea cave. The paths here are wooden scaffolds with barrels and wooden spikes along them. The background itself is a flooded cave with pillars, treasure piles, sea flora and fauna, and waterfalls. In the back is also a view of the sea at night and a cliff shaped like a hedgehog skull.
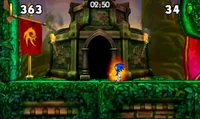
- Gothic Gardens: Challenge Room entrances in Gothic Gardens resemble small, medieval fortresses. These rooms are set an underground dungeon. The rock paths here have cells carved into them, and along them are torches, spears, skeletons, chains and cages on gallows. In the background are also several pillars carved into towers with shoddy scaffolds, chains and paths winding around and between them.


A sealed Challenge Room.
After clearing a Challenge Room, its entrance becomes sealed with an iron gate and a padlock.
Gameplay
In terms of gameplay, the Challenge Rooms are like the adventure levels, but harder and shorter; an average room can be cleared in about a minute or less. Gimmicks encountered here include Bounce Pads, Boost Pads, Enerbeam Swings, platforms that move when stepped on (if they are not already moving), regular moving block platforms, Rails and disappearing platforms. There are as well Water Spouts and blocks of ice/water that can be turned solid or intangible by touching them while using Fire/Ice Mode. Certain Challenge Rooms also put greater emphasis on a specific gimmick theme than others do. However, there are no character-specific gimmicks here, like dash blocks or Air Vents.
Obstacles like blocks with spikes (many of which move in all manner of patterns), spiked surfaces or pits appear much more frequently in the Challenge Rooms than in regular levels. Many of these obstacles either cover large areas along the routes and/or form traps for the characters to fall into. Combined with the fire and ice mechanics, the Challenge Rooms require fast and careful thinking to pass through, and even the slightest misstep can cause a serious setback for the player. The Challenge Rooms also put great emphasis on platforming. Overall, these rooms are more like obstacle courses and the biggest test of platforming skill in Sonic Boom: Fire & Ice.[2]
In gameplay, a Challenge Room's location on the Adventure Maps in the adventure levels is marked by a white tower icon. Inside them, the player's objective is to obtained the Trading Card at the end. Once obtained, the player returns to the Challenge Room's entrance in the adventure level. The Challenge Rooms are treated as a part of their adventure levels, meaning the total time and Ring count in the adventure levels pick up from where they left off when entering a Challenge Room and retain the changes that occurred within it when exiting it. If a character is defeated in a Challenge Room however, the player will respawn at the beginning of it rather than the last Checkpoint.
Description
A Challenge Room can be accessed by pressing ![]() at its entrance gate in its adventure level. After clearing a Challenge Room, the player will be unable to reenter it.
at its entrance gate in its adventure level. After clearing a Challenge Room, the player will be unable to reenter it.
Kodiak Frontier
Ice Fishing Cave
At the start, swing across the spike pit on the left and go down to the lower area via the incoming shaft. There, cross some spiky blocks on the right and go under a moving spike wall. Skip then across some more flipping platforms with spiky bottoms and spiky blocks to reach the Trading Card.
Crystal Grotto
First, get across the pit on the left to reach a Bounce Pad. As the characters are sent up on some water plates, get a solid footing on them to reach the road on the upper right, and go down the hole there. Once in a corridor, outrun the spiky wall approaching from the right and some spiky ceiling blocks before they drop down to reach the drop at the end of the passage. From there, immediately swing to the left to reach the Trading Card.
Whispering Caves
First, climb the water platforms on the left and swing across the pit on the top right. Jump then over a pit with spiky blocks and scale a ledge. From there, get past some spiky pillars on the ceiling that move up and down, and cross a few more pits to reach the Trading Card.
Frostbite Chamber
At the start, grind down a series of Rails on the right while jumping over spiky blocks, some of which move in as the player gets closer. At the end of the Rails, go down the incoming shaft and grind down the Rail on the left which features similar obstacles. At the end of the Rail, cross some more pits ahead to reach the Trading Card.
Seaside Island
Overgrowth
First, go right while avoiding the spiky pillars trying to crush the characters. After passing through a loop to the lower area, go left and cross several pits along the way, many of which contain spiky blocks. At the end, go to the area below via a shaft and ride a moving platform across a pit which dodging spiky blocks. At the end, get under a moving spiky wall to reach the Trading Card.
Boom Temple
At the start, skip across some flipping platforms with spiky bottoms on the right. After that, skip across some moving platforms before they push the characters against the ceiling. Afterwards, climb up to the upper area. There, skip across some smaller flipping platforms over the pit on the left, and run then past some pillars before they drop down. Climb then to the upper area, and cross some pits while outrunning a spiky block approaching from the right to reach the Trading Card.
Jungle Glade
When arriving, grind across the Rail segments on the left. At the end, run to the upper area and grind along the next Rail. This time though, spiky blocks will appear along the Rail. Go upward at the end of the Rail to reach the next area and grind along the Rail there. Along it, spiky blocks will appear in more tricky formations. At the end of this Rail, the Trading Card can be found.
Tangled Mount
At the start, grind down the Rails on the right while skipping between water platforms and dodging spiky blocks. At the end of this section, climb to the upper area and grind down the Rail there while dodging pits and spiky blocks coming in from the left and right. At the end of the Rail, climb to the upper area and grind down the Rail there while avoiding both stationary and enclosing spiky blocks. At the end of the Rail, cross another pit to get to the Trading Card.
Paleo Tarpits
Primordial Wilderness
Primordial Wilderness holds several flipping platforms, all with spiky bottoms. At the start, skip across the flipping patforms on the left and climb then upward via similar plaforms. From there, cross a bridge of flipping plaforms within a narrow passage. Further ahead on the path, cross another bridge of flipping platform, then skip across a series of independent flipping platforms, and then cross another flipping platform bridge to reach the Trading Card.
Sinkhole
At the beginning, swing over the spikes on the left and follow the incoming path to the lower area. Cross then a series of spike pits and spiky blocks (the latter of which will close in on the player to skewer them in one instance) ahead, and go down through an ice block. Follow the path from here across some more pits to arrive at the Trading Card.
Sunken Gulch
The paths in Sunken Gulch move in zigzag-like patterns with increasingly wider spike fields covering the paths' surfaces. First, ride the series of moving platforms to the bottom through the passage on the right. Once there, climb upward again via the passage on the right. When at the top, go to the bottom again through the passage on the right via the moving platforms. At the bottom, climb to the uppermost area via the road on the right, and cross then a series of pits and spikes to reach the Trading Card.
Chasm Lair
Chasm Lair makes heavy use of the Water Spout. First, go to the right, past a spike pit and some spiky pillars that move up and down, to reach a loop. After being sent to the lower area, go left, past some more spike pits and moving pillars with spikes, to reach a Bounce Pad, and follow then the path upward and across some more pits to reach the Trading Card.
Cutthroat Cove
Boneyard Hollow
At the start, cross the pits on the right and pass then some spiky blocks in a narrow passage that come in from the background. Immediately after, follow the path across some more pits to the upper parts of the area and go left from there. When coming to some spiky pillars moving up and down, get past them and cross the upcoming pit of spikes and spiky blocks to reach a road. From there, follow the path to the Trading Card.
Cypress Cavern
At the start, cross first the pits of spikes and spiky blocks on the right, and at the end, climb to the upper area. Follow then the path on the left through the incoming loop to a small room, and climb to the upper area from there. After that, get past a pit and some spiky pillars moving up and down to get to a drop. Descend down there, but watch out for spiky footholds, to find the Trading Card on the right.
Buccaneer's Cove
This Challenge Room is all about Enerbeam Swings and spike pits. At the start, swing and skip across several pits to reach a Bounce Pad at the end leading to the upper area. From there, swing and skip across a similar extensive pit area on the left to reach the Trading Card at the other side.
Treasurer's Plunder
When arriving, ride the moving platform on the right over a pit while dodging spiky blocks. Cross then two spike pits to arrive at a shaft. There, ride a series of moving platforms to the top area, but get off them before they hit the spiked ceilings. Once at the top, go left to reach a bridge of platforms moving up and down between spiked surfaces. Use recesses in the ceiling to cross this bridge safely and arrive at the Trading Card.
Gothic Gardens
Fortune's Spiral
When first arriving, climb the staircase on the right and get then quickly past a spike pit and some spiky blocks coming in from the background. Bounce then to the upper level, and get across some flipping platforms with spiky bottoms on the left. Continue across the spike pit that appears ahead from there and get past some more blocks protruding from the background to reach a path leading straight to the Trading Card.
Canopy Keep
At the start, the section on the right will have a spiked ceiling above the path that moves up and down. To get past it, use the recesses in the floor along the path to hide in. After that, ride a series of moving platforms to the top area, but get off them before they hit the spiked ceilings. At the top, the path ahead will have another moving ceiling with spikes. While this section has recesses in both the ceiling and the floor for the player to hide in, they require more care to use. After this section, the player will find the Trading Card.
Bizarre Vault
First, start by following the path on the right, past some spiky blocks protruding from the background. From there, outrun a spiky wall coming from the left, then cross a pit with spiky blocks and follow the incoming path to the lower area. Down there, cross another pit of spiky blocks and spears, and get then past some spiky pillars that move up and down. Finally, upon coming to a wide pit, ride across it with some moving platforms to reach the Trading Card.
Alcove Block
Alcove Block puts great emphasis on approaching walls. At the start, go down the path on the right. Along the way, the player will descend down a number of "steps" with spike pits while spiky walls appear from the left. Eventually, the player is sent to the upper area where they have to descend steps similar to those before. After that, the player must scale a shaft of water platforms to reach the Trading Card.
Gallery
| Gallery |
|---|
") A Challenge Room on Kodiak Frontier. ") A Challenge Room on Seaside Island. ") A Challenge Room on Paleo Tarpits. ") A Challenge Room on Cutthroat Cove. ") A Challenge Room on Gothic Gardens. |
References
- ↑ Sanzaru Games (September 27, 2016). Sonic Boom: Fire & Ice. Nintendo 3DS. Sega. Level/Area: Frozen Hollow. "Hint: Challenge Room - Got skills? Navigate hazards to collect the Trading Card at the end!"
- ↑ Koopman, Daan (6 September 2016). Sonic Boom: Fire & Ice (3DS) Hands-on Preview. Nintendo World Report. Retrieved on 16 September 2016.